Configure and implement Brick Checkout Page, from dashboard branding settings to API-driven session creation.
Overview
Checkout Page is a hosted Brick payment experience that combines:
- dashboard-managed configuration for branding and embed settings
- API-driven session creation for each transaction
This setup allows merchants to keep page styling and operational settings in the Brick Dashboard, while their backend creates transaction-specific checkout sessions through the API.
Where to Configure Checkout Page
Open the Brick Dashboard and navigate to Settings > Checkout
This page contains the merchant-level configuration for the hosted checkout experience.
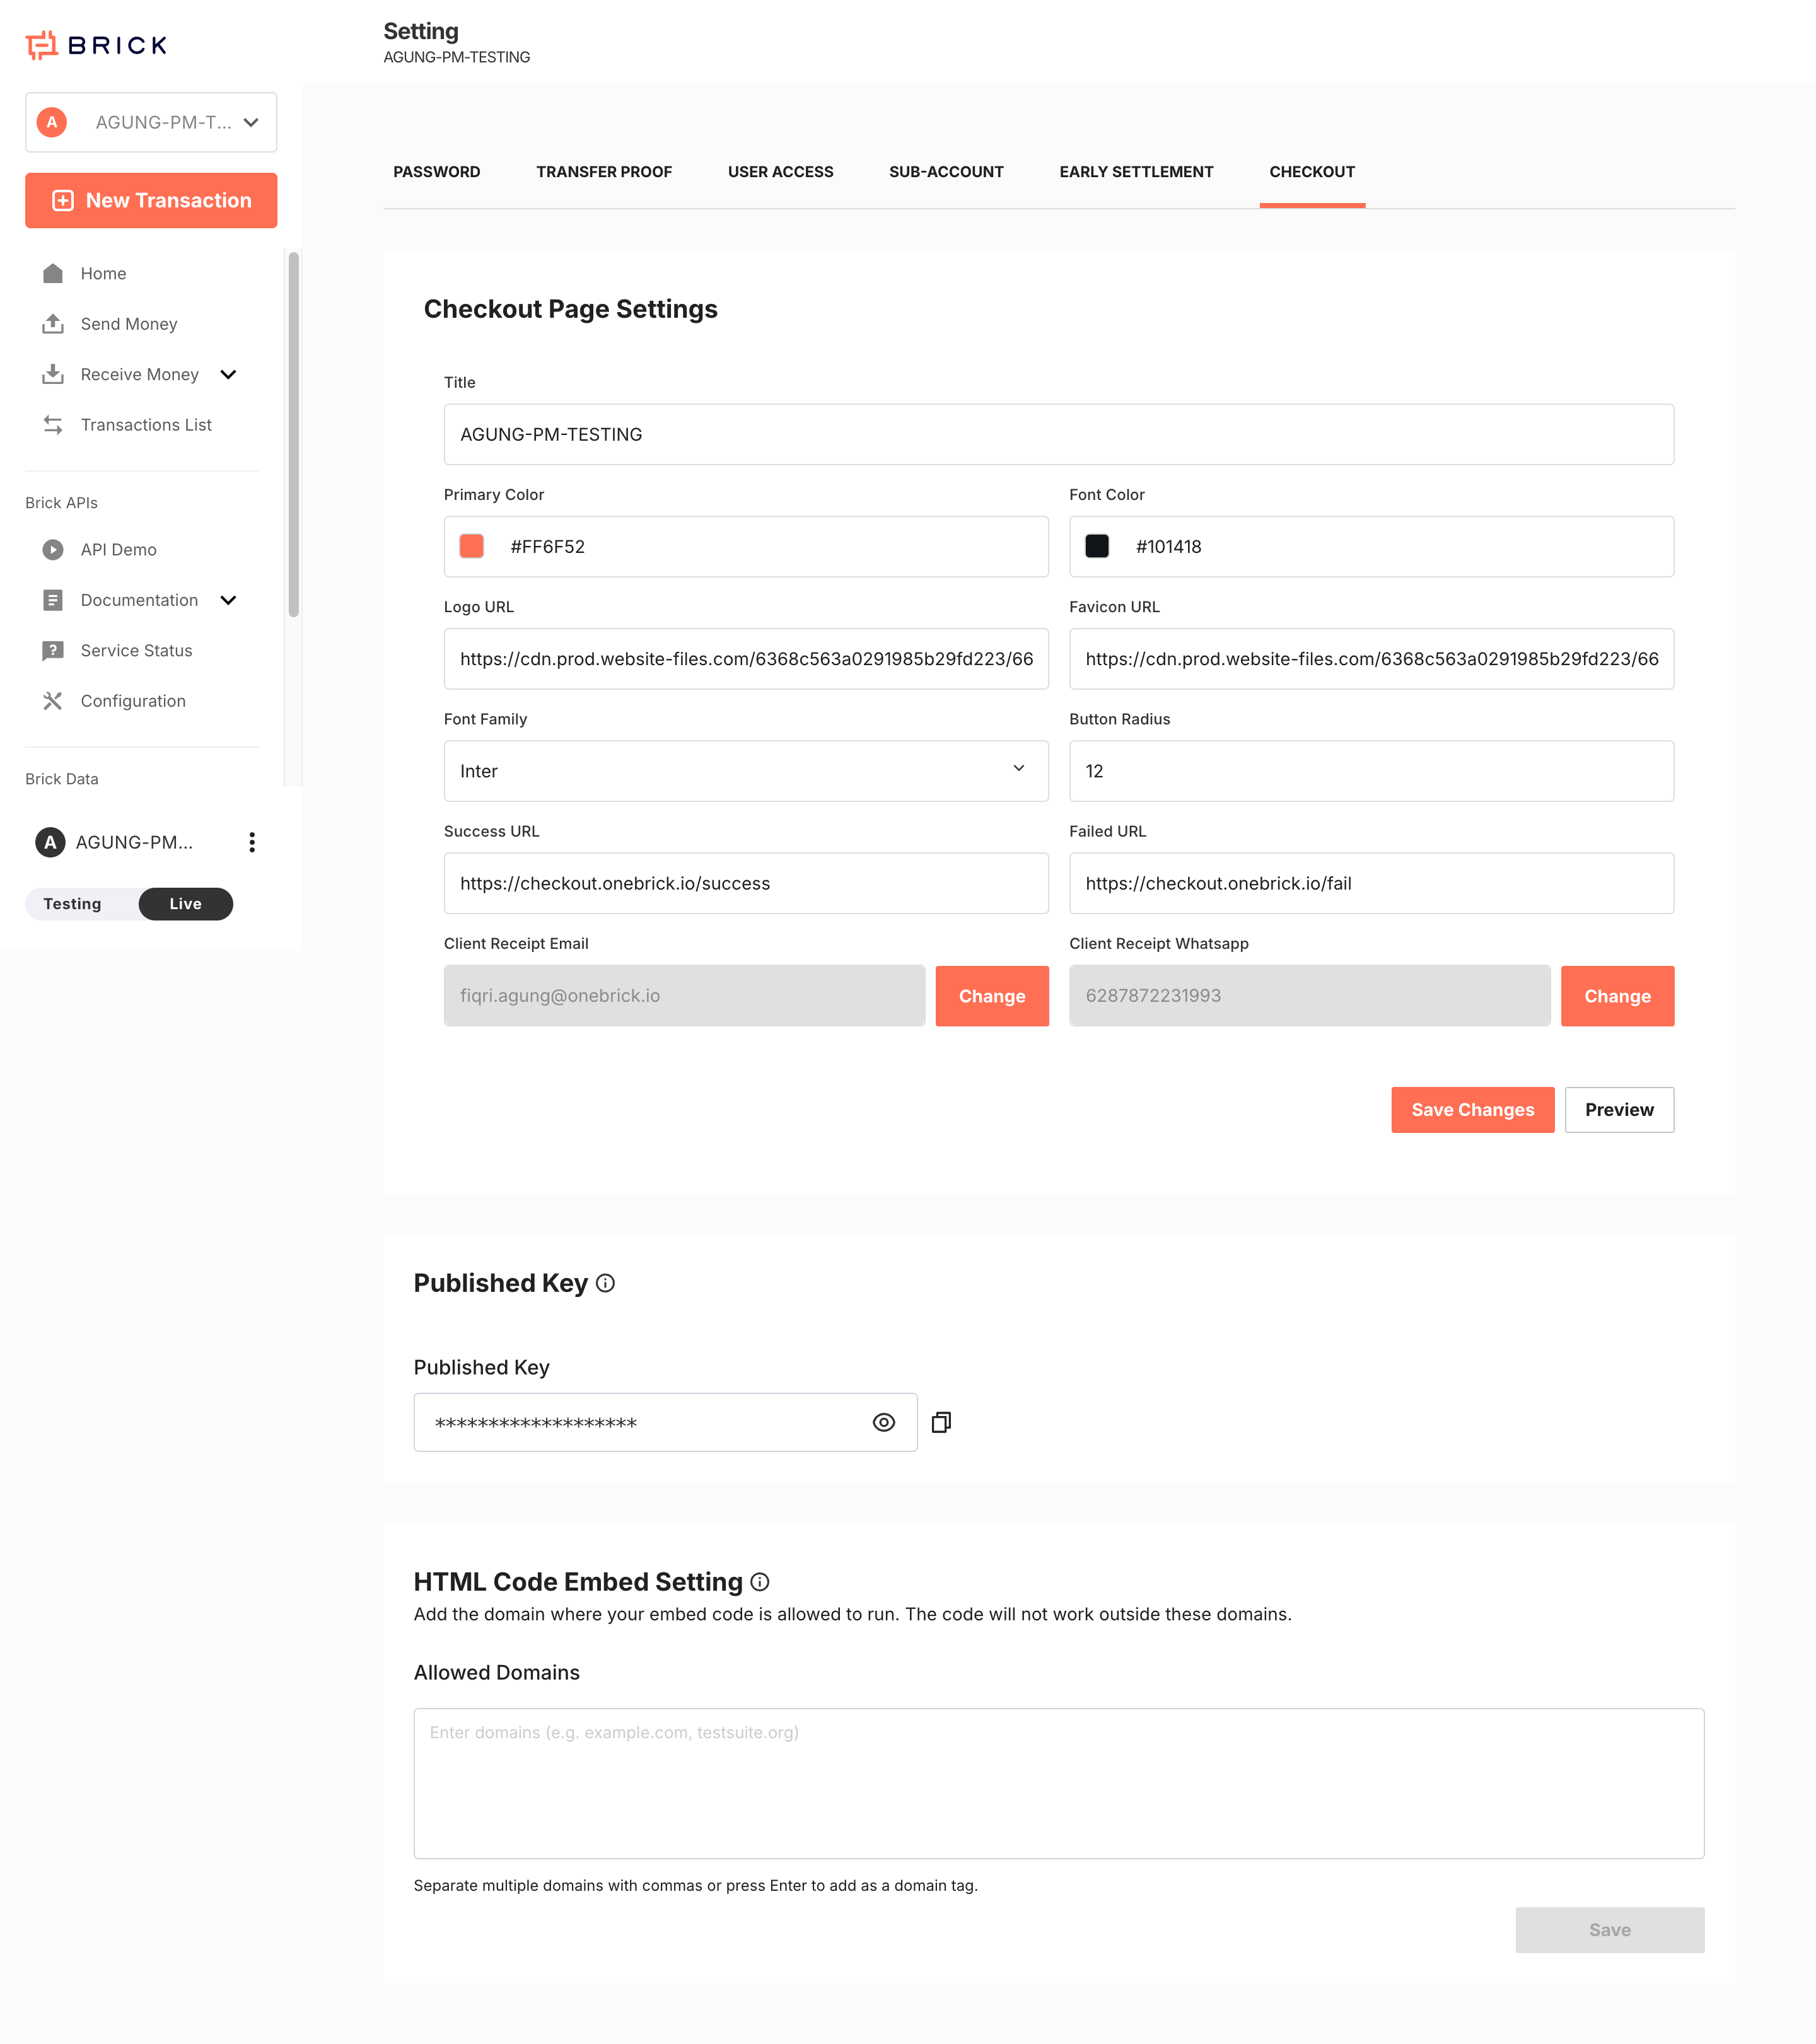
Checkout Page Configuration
The following settings are managed in the Dashboard UI.
| Field | Description | Implementation Notes |
|---|---|---|
Title | Merchant or product title displayed on the hosted page | Use a customer-facing label |
Primary Color | Main brand accent color | Applied to primary UI elements |
Font Color | Main text color | Ensure sufficient contrast |
Logo URL | Logo displayed on the checkout page | Must be publicly accessible |
Favicon URL | Browser tab icon | Must be publicly accessible |
Font Family | Typography setting for the hosted page | Use a supported font |
Button Radius | Button corner radius | Controls visual style |
Success URL | Redirect URL after successful completion | Do not use as the only payment confirmation source |
Failed URL | Redirect URL after failure or cancellation | Use for UX only |
Client Receipt Email | Receipt recipient email | Managed in dashboard |
Client Receipt WhatsApp | Receipt recipient WhatsApp number | Managed in dashboard |
Published Key | Public key for Checkout Page frontend initialization | Safe for frontend usage |
Allowed Domains | Domain allowlist for HTML embed execution | Required for embed flows |
Configuration Responsibilities
Dashboard Responsibilities
The dashboard controls:
- hosted page branding
- redirect behavior
- published key generation
- allowed domains for embedded usage
- receipt contact configuration
Backend Responsibilities
Your backend controls:
- generating a public access token
- creating a checkout session
- storing transaction references
- receiving callbacks
- checking transaction status when needed
Credential Model
Checkout Page uses different credentials for different layers.
| Credential | Used By | Purpose |
|---|---|---|
Published Key | Frontend | Loads merchant checkout configuration |
Client ID | Backend | Used to generate a public access token |
Client Secret | Backend | Used to generate a public access token |
publicAccessToken | Backend API call | Authorizes protected Checkout Page endpoints |
Important rules:
- never expose
Client Secretin frontend code - do not use
Published Keyas an API credential - generate a fresh
publicAccessTokenclose to the time of use
Frontend Entry Points
Checkout Page can be initialized in two ways.
| Entry Point | Purpose |
|---|---|
https://checkout.onebrick.io/?pubkey=<Published Key> | Loads the branded hosted checkout frontend |
checkoutUrl returned by POST /v1/payments/checkout | Opens a transaction-specific payment session |
Use the Published Key when you need the configured hosted frontend or embed flow.
Use the API-generated checkoutUrl when a customer must complete a specific transaction.
Recommended Implementation Flow
Step 1. Configure the Checkout Page in the Dashboard
Before sending any live traffic:
- Set the page title, colors, logo, and favicon.
- Configure
Success URLandFailed URL. - Review receipt destination fields if used.
- Copy the
Published Key. - Add allowed domains if you plan to embed the page.
Step 2. Generate a Public Access Token
Protected Checkout Page API calls require a public access token.
Endpoint
GET /v2/payments/auth/token
Example
curl -u "<CLIENT_ID>:<CLIENT_SECRET>" \
  "https://sandbox.onebrick.io/v2/payments/auth/token"
Example Response
{
  "status": 200,
  "data": {
    "message": "Access token is valid for 5 minutes and can use one time only",
    "accessToken": "eyJhbGciOiJIUzI1NiIsInR5cCI6IkpXVCJ9...",
    "issuedAt": "2026-03-17T11:54:06.736541",
    "expiresAt": "2026-03-17T11:59:06.736541"
  }
}
Step 3. Create the Checkout Session
Call the Checkout Page create endpoint from your backend.
Endpoint
POST /v1/payments/checkout
Headers
publicAccessToken: Bearer <accessToken>
Content-Type: application/json
Example Request
{
  "externalId": "CO-1773723246580",
  "currency": "IDR",
  "description": "Gaming Voucher Free Amount"
}
Optional Fixed-Amount Example
{
  "externalId": "CO-1773723246580",
  "currency": "IDR",
  "description": "Gaming Voucher",
  "amount": 12012,
  "type": "qris"
}
Example cURL
curl --request POST \
  --url "https://sandbox.onebrick.io/v1/payments/checkout" \
  --header "publicAccessToken: Bearer <accessToken>" \
  --header "Content-Type: application/json" \
  --data '{
    "externalId": "CO-1773723246580",
    "currency": "IDR",
    "description": "Gaming Voucher Free Amount"
  }'
Example Response
{
  "status": 200,
  "data": {
    "id": "QyECa1OpjWJcyfzXOLT6HKCxAVoDzUs3",
    "externalId": "CO-1773723246580",
    "status": "CREATED",
    "checkoutUrl": "https://sandbox-checkout.onebrick.io/aiU5tkLQZeZzXXdgwZUenOyGgTf41mKqyXv9XS96yB4QE9lze2wuMFhfPH4jMC2%2B",
    "currency": "IDR",
    "amount": null,
    "type": "",
    "createdAt": "2026-03-17T04:54:06Z",
    "description": "Gaming Voucher Free Amount"
  },
  "errors": null,
  "hashcode": "38d4b6cc3dd7a6cbb400f08c3bed1228"
}
Step 4. Present the Checkout to the Customer
You can present the checkout in either of these patterns:
- redirect the customer to
checkoutUrl - open
checkoutUrlfrom a button or CTA - initialize the branded Checkout Page frontend using the
Published Key - embed the page if the origin domain is allowlisted
Step 5. Confirm the Payment Outcome
Do not rely only on redirect URLs.
Use:
- Brick callbacks as the source of truth
- status checks for operational verification when required
HTML Embed Configuration
If you plan to embed Checkout Page:
- Add all allowed origins under
Allowed Domains. - Save the configuration.
- Test the embed from each approved domain.
If the origin is not allowlisted, the hosted page or related status checks may fail due to origin restrictions.
Implementation Constraints
Token Constraints
- public access tokens are short-lived
- tested token responses state that they are valid for 5 minutes and one-time use
- generate a new token before protected requests
Environment Constraints
| Environment | Base URL |
|---|---|
| Sandbox | https://sandbox.onebrick.io |
| Production | https://api.onebrick.io |
Use explicit https:// in all base URLs.
Avoid:
http://sandbox.onebrick.io
HTTP redirects may cause some clients to retry as GET, which can trigger 405 method_not_allowed.
Reference Constraints
externalIdshould be unique per transaction- store both your
externalIdand Brick's returned transaction ID
Channel Constraints
qrisandvirtual_accountare supported in the tested collection- QRIS amount limits and Virtual Account limits follow the Receive Money product rules configured by Brick
Troubleshooting
400 Bad Request
Typical causes:
- missing required fields
- invalid JSON
- wrong field type
Best practice:
- send valid JSON only
- do not place comments inside JSON request bodies
401 Unauthorized
Typical causes:
- invalid token
- missing token
- expired token
- wrong environment credentials
405 Method Not Allowed
Typical causes:
- using
GETinstead ofPOSTfor/v1/payments/checkout - posting to an
http://URL and letting the client follow a redirect
Recommended Backend Data to Store
For each Checkout Page session, store at minimum:
externalId- Brick transaction ID
checkoutUrlstatuscurrencyamountdescription- creation timestamp
This will help with reconciliation, support investigation, and callback matching.
Go-Live Checklist
- Confirm production access is enabled.
- Configure production callback URLs.
- Review all branding fields under
Settings > Checkout. - Validate
Success URLandFailed URL. - Copy and verify the
Published Key. - Add all approved domains to
Allowed Domains. - Test one open-amount and one fixed-amount flow in sandbox.
- Validate callbacks before switching to production.